Table of Contents

Blown-in interior insulation using capillary-active insulation material
This is ideal as a do-it-yourself measure (except for installing the loose-fill insulation itself). There will still be a team available for spraying the insulation, even before the coming winter; this will be pretty fast if preparations (see below) have been made. It's not difficult with the tools available today.
Is it even worthwhile?
We can calculate that very easily for your case using the online calculator: Will interior insulation be economically worthwhile in my case?
Practical implementation in 7 steps
Step 0: Is it even possible? a) Is the wall damp? (German only) Then it will need to dry out first. b) Is the old interior plaster and old wallpaper still in good condition? If not, then remove it and apply filling plaster if necessary, but let everything dry out first! c) Are there any water-carrying pipes in this wall? If so, then interior insulation will not be the right solution here! d) Is the exterior plaster in good condition (test by tapping on it!) and dry? e) Before any drilling and/or inserting of dowels takes place, it is advisable to identify the routing of electrical lines using a line detection device and mark these!
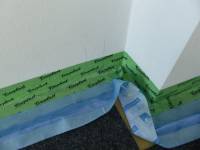 Step 1: Preparation: clean the wall without water (by brushing), if there is existing carpeting, cut and remove a +12 cm strip in front of the wall to be insulated. Remove any cover strips at the edges if present; the gap between the screed and wall will then become visible, inside which there will be a strip of edge insulation. Seal this gap using diffusion-open adhesive tape (a few cm on the floor, a few cm on the wall, see picture)1) . First make sure that routing of electrical lines in the old wall has been marked (Step 0)?

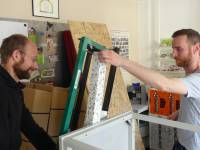
Step 2: prepare the sub-construction: in the case documented here, we bonded a 60 mm x 40 mm standard lath to a piece of EPS material of the same size in order to obtain an insulation holder/support with b =60 mm, h = 80 mm 2) . This will provide an adequate cavity for the insulation material to be inserted, and it will support the interior cladding, is decoupled from noise and heat and is easy to work with {you can also use wood fibre insulation panels if you don't want EPS}; holes are pre-drilled in the supports which are then attached to the wall using dowels/anchors. Sound-decoupling 3) is ensured by means of PE foam tape or cork strips (depending on the type of building material); the edges can be plugged for example with hemp fibre - before sealing (see Step 5). Important: Everything must be airtightly sealed. This will become 'visible' during blowing in the insulation, but it is especially important in order to ensure that the warm moisture-laden indoor air does not carry vast amounts of water vapour towards the now cold old surface. If you wish to understand these processes you can read up on the topic here: What does relative humidity actually mean? (German only)

 Step 3: attach the sub-construction using anchors (or window frame screws). Of course, holes can be drilled in the lath in advance so that the screw can be inserted easily. A (powerful) cordless screwdriver can be used for mounting with the window frame screws; a hammer will be needed if anchors are used instead.

Step 4: cover the inner side with OSB or chipboards. This can also be done quite quickly today using a cordless screwdriver, dismantling again can then be done easily if needed. For even faster work, an electric stapler can be used since there is no reason why the construction should ever be dismantled. It will become an integral part of the exterior wall and in Germany such walls often remain functional for more than a hundred years. The materials used here are not “disposable products”4) . Interestingly, the most important resource here is recycled paper - that is a product that has already been used (once, for a short time) - which is now “stored” and therefore escapes being burnt (CO2!) and in this way contributes even further to climate protection.

Step 5: In this case sealing between the boards AND along the edges takes place using diffusion open adhesive tape. This is, and remains, extremely important in every interior insulation installation: warm humid indoor air must not enter behind the insulation under any circumstances "There should NEVER be any air flow behind interior insulation" (German only). This also applies for capillary-active insulation materials.

Step 6: Drill holes for the blown-in insulation. This can also be left to the company that will install the insulation, because it is very fast and these experts know best where holes should be placed and what size they need to be.
Step 7: Commission the company for installation of capillary-active insulation material (e.g. cellulose flakes). This is usually a small self-employed trade business that works in the region. If it is an established company it will probably be a member of a professional association for cavity insulation (German only)5) .
The insulation can now be blown-in:
 |  |  |
| This is actually recycled paper: recycling material which has been utilised for many decades. | The blowing-in process itself is very fast. | The opening for installing insulation has been sealed again. |

Apart from the detail connections and the “finishing” (wallpaper or coat of paint), the interior insulation is now complete. 6)
Typical connection details: airtight and thermal bridge minimised
Connection: Flooring to interior insulation of exterior wall
Key word: there should be no gaps, installation should be sound-proof, and everything should be absolutely airtightly sealed! In this case we recommend taping because this is already the method of choice for the butt joints between the interior formwork panels.
Connection: Interior wall to interior insulation of exterior wall
Key word: 20 to 40 cm flanking insulation or insulation 7) wedge; an insulation wedge made of wood fibre insulation or some other capillary-active material can also be used in this case; even any conventional insulation wdge will be a solution, because we do nat have an vapour diffusion issue here, it is all just about interior surface temperatures.
Connection: Ceiling to interior insulation of exterior wall
Key word: The most obvious solution here is again an insulation wedge!
Connection: Window to interior insulation of the window reveal
Key word: basically the window reveal must ALSO be insulated when interior insulation is carried out. The wall surfaces would otherwise become too cold - causing damp spots. Space is always available for 20 mm capillary-active insulation material; but even if that is not possible, any insulation wedge is a solution for this as well.
No abrupt end with interior insulation!
Key word: Insulation should always be tapered off using wedge-shaped insulation.
And what about power sockets?
Key word: place a power strip inside the socket which is to be dealt with; pass the cable though a hole made in the interior insulation, use a collar seal for this purpose. Power strips for mounting on walls and well-designed “power strip towers” are available; installation in the skirting board is also conceivable - but the inner cladding should not be ripped open for this as that would not be worth it.
Problem with hole drilling?
Will the interior insulation be damaged if a screw is screwed into the inner cladding for fastening something? No, it won't have any effect (unless there is an electric cable present here - so check for this in advance!), because obviously the screw will seal the hole perfectly. A problem would only arise if the screw is removed again, in which case the appropriate sealing tape used previously can be used to seal the hole again.
Finally: wallpaper or just “woodchip effect textured paint” can be applied.
Back to overview of "Structural measures for saving energy" (German only)
Online calculator for calculating the economic profitability of your case (German only)
Back t overview of interior insulation of exterior walls (German only)
Alternative: Measures for insulation on the outside of exterior walls (German only)
Alternative: Thermal protection with a rainscreen façade /curtain wall façade (German only)
Alternative: Plaster base formwork for retrofitted loose-fill insulation (German only)
Overlapping information on thermal protection measures for buildings